Introduction
I recently built Q Log Session Viewer — a VS Code extension that reads Amazon Q chat history and debug logs from your local machine and displays them in a browsable, filterable UI right inside VS Code. In this post I'll walk through every step: scaffolding the project, writing the extension code, packaging it, and publishing it to the VS Code Marketplace.
By the end you'll have a clear mental model of how VS Code extensions work and a repeatable process for publishing your own.
What We're Building
The extension adds an Activity Bar icon (sidebar panel) and a full editor panel that reads:
It parses those files and renders sessions as cards, with drill-down into individual log entries.
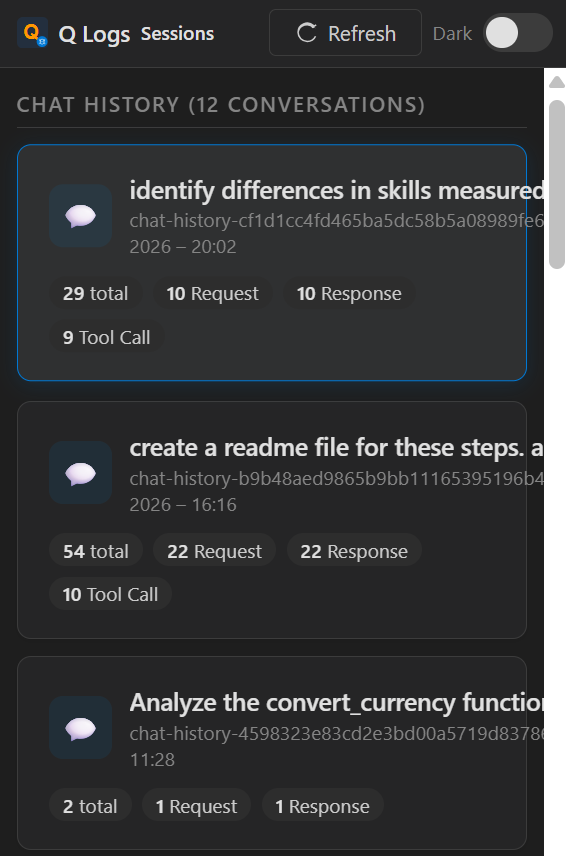
Sessions overview — chat history and log sessions shown as cards

Entry detail view — filter by category, search, and inspect full JSON
Prerequisites
Before starting, install:
npm install -g yo generator-code
Step 1 — Scaffold the Project
Run the Yeoman generator and answer the prompts:
yo code
Choose:
New Extension (TypeScript)
Name: q-log-session-viewer
Identifier: q-log-session-viewer
Description: View and analyze local Q-related debug logs and chat history from VS Code
Initialize git: Yes
Bundle with webpack/esbuild: esbuild (faster builds)
Tip: If you prefer to skip Yeoman, just create the folder structure manually. The generator only saves a few minutes.
The generated structure looks like this:
q-log-session-viewer/
├── src/
│   └── extension.ts        ← entry point
├── resources/              ← icons, screenshots
├── .vscodeignore
├── esbuild.js
├── package.json
└── tsconfig.json
package.json is the heart of a VS Code extension. It declares commands, views, menus, and metadata that VS Code reads at install time.
Here is the full package.json for this extension:
{
  "name": "q-log-session-viewer",
  "displayName": "Q Log Session Viewer (Unofficial)",
  "description": "View and analyze local Q-related debug logs and chat history from VS Code",
  "version": "0.1.1",
  "publisher": "SiddheshPrabhugaonkar",
  "author": {
    "name": "Siddhesh Prabhugankar",
    "url": "https://github.com/siddheshp"
  },
  "license": "MIT",
  "icon": "resources/icon.png",
  "galleryBanner": { "color": "#232F3E", "theme": "dark" },
  "engines": { "vscode": "^1.85.0" },
  "categories": ["Debuggers", "Other"],
  "keywords": ["logs", "debug", "chat", "viewer", "analysis"],
  "activationEvents": [],
  "main": "./out/extension.js",
  "contributes": {
    "commands": [
      {
        "command": "amazonq-logviewer.open",
        "title": "Q Log Session Viewer: Open",
        "icon": {
          "light": "resources/icon-sidebar-light.svg",
          "dark": "resources/icon-sidebar-dark.svg"
        }
      },
      {
        "command": "amazonq-logviewer.refresh",
        "title": "Q Log Session Viewer: Refresh",
        "icon": "$(refresh)"
      }
    ],
    "viewsContainers": {
      "activitybar": [
        {
          "id": "amazonq-logviewer",
          "title": "Q Logs",
          "icon": "resources/icon-sidebar-dark.svg"
        }
      ]
    },
    "views": {
      "amazonq-logviewer": [
        {
          "type": "webview",
          "id": "amazonq-logviewer.viewer",
          "name": "Log Viewer"
        }
      ]
    },
    "menus": {
      "editor/title": [
        { "command": "amazonq-logviewer.open", "group": "navigation" }
      ]
    }
  },
  "scripts": {
    "vscode:prepublish": "npm run compile",
    "compile": "node esbuild.js",
    "watch": "node esbuild.js --watch",
    "package": "vsce package"
  },
  "devDependencies": {
    "@types/node": "^20.11.0",
    "@types/vscode": "^1.85.0",
    "@vscode/vsce": "^3.9.1",
    "esbuild": "^0.20.0",
    "sharp": "^0.34.5",
    "typescript": "^5.3.0"
  }
}
Key things to understand:
| Field | Purpose |
|---|
publisher | Must match your Marketplace publisher ID exactly |
engines.vscode | Minimum VS Code version required |
activationEvents: [] | With modern VS Code, contributed commands/views can activate the extension when used |
contributes.viewsContainers | Registers the Activity Bar icon |
contributes.views | Registers the webview panel inside the sidebar |
vscode:prepublish | Script that runs before vsce package |
Step 3 — Set Up esbuild
Instead of the default tsc compiler, this extension uses esbuild for fast bundling. Create esbuild.js:
const esbuild = require('esbuild');

const watch = process.argv.includes('--watch');

const buildOptions = {
  entryPoints: ['src/extension.ts'],
  bundle: true,
  outfile: 'out/extension.js',
  external: ['vscode'],          // vscode is provided by the host, never bundle it
  format: 'cjs',
  platform: 'node',
  target: 'node18',
  sourcemap: true,
  minify: !watch,
};

if (watch) {
  esbuild.context(buildOptions).then(ctx => {
    ctx.watch();
    console.log('Watching for changes...');
  });
} else {
  esbuild.build(buildOptions).then(() => console.log('Build complete'));
}
Important: Always add vscode to external. It is injected by VS Code at runtime and must never be bundled.
Step 4 — Write the Extension Entry Point
src/extension.ts is the file VS Code calls when the extension activates. It registers commands and the sidebar webview provider:
import * as vscode from 'vscode';
import { LogViewerPanel, LogViewerSidebarProvider } from './logViewerPanel';

export function activate(context: vscode.ExtensionContext) {
  // Register the sidebar webview (Activity Bar panel)
  const sidebarProvider = new LogViewerSidebarProvider(context.extensionUri);
  context.subscriptions.push(
    vscode.window.registerWebviewViewProvider('amazonq-logviewer.viewer', sidebarProvider)
  );

  // Command: open full editor panel
  context.subscriptions.push(
    vscode.commands.registerCommand('amazonq-logviewer.open', () => {
      LogViewerPanel.createOrShow(context.extensionUri);
    })
  );

  // Command: refresh data
  context.subscriptions.push(
    vscode.commands.registerCommand('amazonq-logviewer.refresh', () => {
      LogViewerPanel.currentPanel?.refresh();
      sidebarProvider.refresh();
    })
  );
}

export function deactivate() {}
Two patterns to note:
Push to context.subscriptions — VS Code automatically disposes these when the extension deactivates, preventing memory leaks.
deactivate() — called when VS Code shuts down or the extension is disabled. Leave it empty if you have nothing to clean up.
Step 5 — Read Local Log Files (logProvider.ts)
This class handles all filesystem access. It resolves the correct log paths per OS:
import * as fs from 'fs';
import * as path from 'path';
import * as os from 'os';

export class LogProvider {
  private logBase: string;
  private historyDir: string;

  constructor() {
    const home = os.homedir();
    const platform = os.platform();

    if (platform === 'win32') {
      const appdata = process.env.APPDATA || path.join(home, 'AppData', 'Roaming');
      this.logBase = path.join(appdata, 'Code', 'logs');
    } else if (platform === 'darwin') {
      this.logBase = path.join(home, 'Library', 'Application Support', 'Code', 'logs');
    } else {
      this.logBase = path.join(home, '.config', 'Code', 'logs');
    }

    this.historyDir = path.join(home, '.aws', 'amazonq', 'history');
  }

  // ... getSessionLogs() and getChatHistoryFiles() methods
}
Log paths by OS:
| OS | Extension Logs | Chat History |
|---|
| Windows | %APPDATA%\Code\logs\...\Amazon Q Logs.log | ~\.aws\amazonq\history\ |
| macOS | ~/Library/Application Support/Code/logs/... | ~/.aws/amazonq/history/ |
| Linux | ~/.config/Code/logs/... | ~/.aws/amazonq/history/ |
Step 6 — Build the Webview Panel (logViewerPanel.ts)
VS Code extensions can render arbitrary HTML inside WebviewPanel (full editor tab) or WebviewView (sidebar). Both are used here.
Security: Content Security Policy + Nonce
Every webview must set a strict CSP. A nonce (random string per render) is used to allow only your inline scripts:
function getNonce(): string {
  let text = '';
  const possible = 'ABCDEFGHIJKLMNOPQRSTUVWXYZabcdefghijklmnopqrstuvwxyz0123456789';
  for (let i = 0; i < 32; i++) {
    text += possible.charAt(Math.floor(Math.random() * possible.length));
  }
  return text;
}
The CSP meta tag in the HTML:
<meta http-equiv="Content-Security-Policy"
  content="default-src 'none';
           style-src 'nonce-${nonce}';
           script-src 'nonce-${nonce}';">
Two-Way Messaging
The webview and extension communicate via postMessage:
// Extension → Webview: send data
panel.webview.postMessage({ command: 'dataLoaded', historyFiles, logSessions });

// Webview → Extension: request data
panel.webview.onDidReceiveMessage(message => {
  if (message.command === 'loadData') {
    const data = logProvider.loadAllData();
    panel.webview.postMessage({ command: 'dataLoaded', ...data });
  }
});
Inside the webview HTML:
const vscode = acquireVsCodeApi();

// Send message to extension
vscode.postMessage({ command: 'loadData' });

// Receive message from extension
window.addEventListener('message', event => {
  if (event.data.command === 'dataLoaded') {
    renderSessions(event.data.historyFiles, event.data.logSessions);
  }
});
export class LogViewerSidebarProvider implements vscode.WebviewViewProvider {
  resolveWebviewView(webviewView: vscode.WebviewView, ...) {
    webviewView.webview.options = {
      enableScripts: true,
      localResourceRoots: [vscode.Uri.joinPath(this._extensionUri, 'resources')]
    };
    webviewView.webview.html = getViewerHtml(getNonce());
    // ... message handler
  }
}
Step 7 — Add Icons
VS Code requires icons in specific formats:
Marketplace icon: resources/icon.png — 128×128 PNG, referenced in package.json as "icon"
Activity Bar icon: SVG file — VS Code tints it automatically to match the theme; keep it a simple monochrome shape
"viewsContainers": {
  "activitybar": [
    {
      "id": "amazonq-logviewer",
      "title": "Q Logs",
      "icon": "resources/icon-sidebar-dark.svg"
    }
  ]
}
Gotcha: Activity Bar icons are always rendered as monochrome by VS Code regardless of the SVG colors. Design them as single-color silhouettes.
.vscodeignore works like .gitignore but for the packaged .vsix file. Exclude everything that isn't needed at runtime:
.vscode/**
node_modules/**
src/**
esbuild.js
tsconfig.json
**/*.map
**/*-b64.txt
resources/screenshots/*.png
Keep in the package:
Step 9 — Test Locally
Press F5 in VS Code to launch the Extension Development Host — a second VS Code window with your extension loaded.
You'll see the Q Logs icon appear in the Activity Bar:
Iterate quickly with:
npm run watch
esbuild rebuilds in milliseconds on every save. Reload the Extension Development Host with Ctrl+R (or Cmd+R on Mac) to pick up changes.
Step 10 — Package the Extension
Install vsce (the VS Code Extension CLI) if you haven't already:
npm install -g @vscode/vsce
Then package:
vsce package
This produces a .vsix file (e.g. q-log-session-viewer-0.1.1.vsix). You can install it locally to test the final artifact:
code --install-extension q-log-session-viewer-0.1.1.vsix
Step 11 — Create a Publisher Account
Go to https://marketplace.visualstudio.com/manage
Sign in with a Microsoft account
Click Create publisher
Choose a publisher ID (e.g. SiddheshPrabhugaonkar) — this must match the "publisher" field in package.json exactly
You also need a Personal Access Token (PAT):
Go to https://dev.azure.com → your organization → User Settings → Personal Access Tokens
Click New Token
Set scope to Marketplace → Manage
Copy the token — you won't see it again
Authenticate vsce with your token:
vsce login SiddheshPrabhugaonkar
# Paste your PAT when prompted
Step 12 — Write a Good README
The README.md in your extension folder becomes the Marketplace listing page. Make it count:
Lead with what the extension does and who it's for
Include screenshots (host them on GitHub or a CDN — relative paths don't work on the Marketplace)
List features, commands, and requirements
Add a disclaimer if your extension reads data from another product
Screenshot URLs must be absolute:

Tip: Create a separate public GitHub repo just for assets (screenshots, GIFs). This keeps your extension repo clean and the URLs stable.
Step 13 — Publish to the Marketplace
vsce publish
That's it. vsce will:
Run npm run vscode:prepublish (which runs npm run compile)
Package the .vsix
Upload it to the Marketplace
To publish a specific version bump:
vsce publish patch   # 0.1.0 → 0.1.1
vsce publish minor   # 0.1.0 → 0.2.0
vsce publish major   # 0.1.0 → 1.0.0
After a few minutes your extension appears at: https://marketplace.visualstudio.com/items?itemName=SiddheshPrabhugaonkar.q-log-session-viewer
Step 14 — Update the Extension
For subsequent releases:
Make your code changes
Update CHANGELOG / release notes in README.md
Run vsce publish patch (or minor/major)
The Marketplace auto-notifies users who have the extension installed.
Project File Structure (Final)
VSCodeExtention/
├── resources/
│   ├── icon.png                  ← Marketplace icon (128×128 PNG)
│   ├── icon-sidebar-dark.svg     ← Activity Bar icon
│   └── icon-sidebar-light.svg
├── src/
│   ├── extension.ts              ← activate() / deactivate()
│   ├── logProvider.ts            ← filesystem reads
│   └── logViewerPanel.ts         ← WebviewPanel + WebviewView + HTML
├── .vscodeignore
├── esbuild.js
├── package.json
├── tsconfig.json
└── README.md
Key Concepts Recap
| Concept | What it does |
|---|
contributes.viewsContainers | Adds an icon to the Activity Bar |
contributes.views | Registers a panel inside that container |
WebviewPanel | Full editor tab with custom HTML |
WebviewViewProvider | Sidebar panel with custom HTML |
postMessage / onDidReceiveMessage | Two-way communication between extension and webview |
| Nonce + CSP | Security: prevents XSS in webviews |
context.subscriptions | Automatic cleanup on deactivation |
vsce package | Creates the installable .vsix |
vsce publish | Uploads to the VS Code Marketplace |
Common Gotchas
vscode must be in external in your bundler config — never bundle it
Marketplace icon must be PNG, not SVG
Screenshot URLs in README must be absolute — relative paths break on the Marketplace page
Publisher ID in package.json must exactly match your Marketplace publisher account
Activity Bar SVG icons are always monochrome — VS Code tints them; don't rely on color
CSP default-src 'none' — be explicit about what your webview is allowed to load; no external CDNs unless you add them to the CSP
Resources
Built by Siddhesh Prabhugankar — Microsoft Certified Trainer & AI Consultant
GitHub: github.com/siddheshp · LinkedIn: linkedin.com/in/siddheshprabhugaonkar