Project Overview
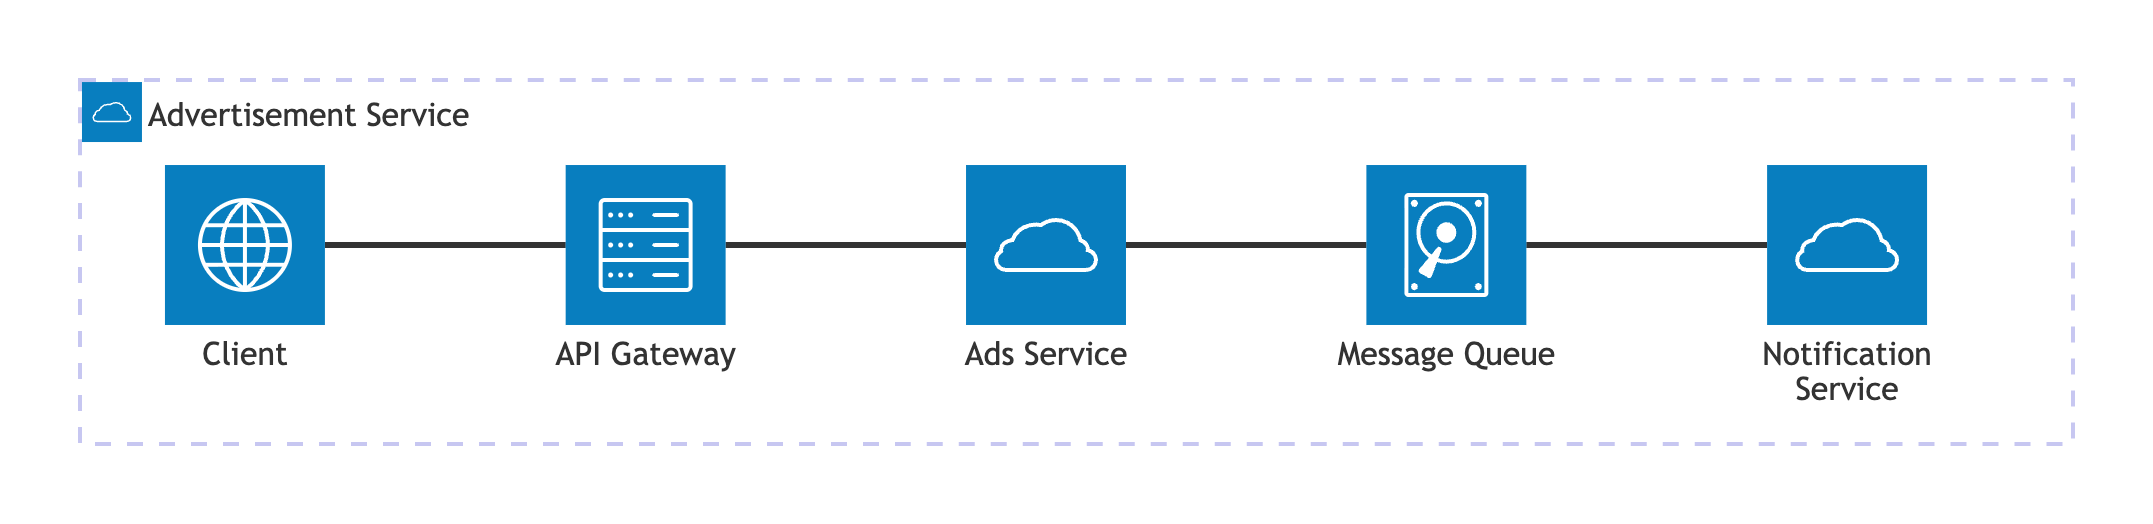
In this example, we will build a simple advertisement platform. This platform will send a notification if the advertisement is created. The message queue is utilized as a buffer between the advertisement service and the notification service.
This is the architecture diagram of this project.
Develop the Project
Project Setup
The project is implemented using microservices architecture. These are the key components of the project:
- Advertisement service: the service to handle advertisement feature including create a new advertisement.
- Notification service: the service for handling the advertisement notification.
- API Gateway: the main entrypoint for client to accessing the available services.
The project structure is implemented using Go workspace. This is the overview of the project structure.
go-mini-ads
 ┣ ads
 ┣ common
 ┃ ┣ models
 ┃ ┣ rabbitmq
 ┃ ┣ utils
 ┣ gateway
 ┣ notification
 ┣ .env
 ┣ .gitignore
 ┣ docker-compose.yml
The very first step is to create a Go workspace. Initialize the Go Workspace using this command.
go work init
After creating the workspace, notice that the go.work file is created. Adjust the go.work file to include the required packages.
go 1.25.5

use (
./ads
./gateway
./notification
./common
)
Create the .env file to store the required configurations.
APP_MODE="production"

ADS_SERVICE_BASE_URL="http://ads-service:1323"

RABBITMQ_USER="admin"
RABBITMQ_PASS="secretpassword123"
RABBITMQ_HOST="rabbitmq-service"
RABBITMQ_PORT="5672"
If not using Docker compose, ensure to change the app mode to dev and change ads-service & RABBITMQ_HOST to localhost.
Create Common Utilities
Create a new directory called common. After that, initialize a go module for this package.
go mod init common
Install the required packages.
go get github.com/spf13/viper
go get github.com/rabbitmq/amqp091-go
Inside the common directory, create a new directory called models to store required entities for the services.
Inside the models directory, create a new file called ad.go to store the data model of the advertisement.
package models

type Ad struct {
ID       string `json:"id"`
Title    string `json:"title"`
Content  string `json:"content"`
Category string `json:"category"`
}
Inside the models directory, create a new file called request.go to store the request entity for creating a new advertisement.
package models

type AdRequest struct {
Title    string `json:"title"`
Content  string `json:"content"`
Category string `json:"category"`
}
Inside the models directory, create a new file called response.go to store the response entity. This entity is using generic which means the type of the data can be adjusted dynamically.
package models

type Response[T any] struct {
Success bool   `json:"success"`
Message string `json:"message"`
Data    T      `json:"data"`
}
After the entities are created, create a new directory called utils to store the utility functions and constants. The utils package will be used across the services.
Create a file called constants.go to store the constant values. The constant values are used for ensuring the consistency of the value.
package utils

const ADS_QUEUE = "ads"

// env value keys
const (
APP_MODE             = "APP_MODE"
ADS_SERVICE_BASE_URL = "ADS_SERVICE_BASE_URL"
RABBITMQ_USER        = "RABBITMQ_USER"
RABBITMQ_PASS        = "RABBITMQ_PASS"
RABBITMQ_HOST        = "RABBITMQ_HOST"
RABBITMQ_PORT        = "RABBITMQ_PORT"
)

const (
APP_MODE_PRODUCTION = "production"
)
This application uses .env file for storing and fetching the configurations. To fetch the values from the .env file, create a new utility function called GetConfig inside the config.go file.
package utils

import (
"log"
"os"

"github.com/spf13/viper"
)

func GetConfig(key string) string {
isDevelop := os.Getenv(APP_MODE) != APP_MODE_PRODUCTION

if isDevelop {
viper.AddConfigPath(".")
viper.SetConfigFile(".env")

if err := viper.ReadInConfig(); err != nil {
log.Fatalf("error when reading configuration file: %s\n", err)
}

return viper.GetString(key)
}

return os.Getenv(key)
}
To interact with RabbitMQ service conveniently, create a dedicated directory called rabbitmq. Inside this directory, create a new file called rabbitmq.go.
Inside the rabbitmq.go, the RabbitMQ instance will be created, this instance can initialize required setups (like: connection, queue and channel) and provides basic functionalities like publish and consume messages.
First, import the required package and create a struct that act as a RabbitMQ instance.
package rabbitmq

import (
"common/utils"
"context"
"errors"
"fmt"

"github.com/rabbitmq/amqp091-go"
amqp "github.com/rabbitmq/amqp091-go"
)

type RabbitMQ struct {
Channel *amqp.Channel
Queue   amqp.Queue
}
Create a function to retrieve the RabbitMQ address.
func GetRabbitMQAddress() string {
return fmt.Sprintf("amqp://%s:%s@%s:%s/",
utils.GetConfig(utils.RABBITMQ_USER),
utils.GetConfig(utils.RABBITMQ_PASS),
utils.GetConfig(utils.RABBITMQ_HOST),
utils.GetConfig(utils.RABBITMQ_PORT),
)
}
Create a function to initialize the RabbitMQ connection. This function returns a connection object that can be used for interacting with the RabbitMQ service.
func InitConnection(address string) (*amqp.Connection, error) {
conn, err := amqp.Dial(address)
if err != nil {
return nil, fmt.Errorf("failed to connect: %s\n", err)
}

return conn, nil
}
Create a function to initialize the connection channel. This function returns a connection channel that can be used for using RabbitMQ features like send and consume messages.
func InitChannel(conn *amqp.Connection) (*amqp.Channel, error) {
ch, err := conn.Channel()
if err != nil {
return nil, fmt.Errorf("failed to open channel: %s\n", err)
}

return ch, nil
}
Create a function to initialize the queue. The queue uses FIFO principle which means the first message comes in, that message will be retrieved first.
func DeclareQueue(ch *amqp.Channel) (amqp.Queue, error) {
q, err := ch.QueueDeclare(
utils.ADS_QUEUE, // name
true,            // durability
false,           // delete when unused
false,           // exclusive
false,           // no-wait
amqp.Table{
amqp.QueueTypeArg: amqp.QueueTypeQuorum,
},
)
if err != nil {
return amqp.Queue{}, fmt.Errorf("failed to create queue: %s\n", err)
}

return q, nil
}
Create a function to initialize the RabbitMQ instance. When initializing this instance, the previous created functions are called and assembled together.
Using this approach makes the code more clean and easy to refactor when there is an additional changes when initializing the instance.
func InitRabbitMQ() (*RabbitMQ, error) {
address := GetRabbitMQAddress()
conn, connErr := InitConnection(address)
ch, chErr := InitChannel(conn)
q, qErr := DeclareQueue(ch)

err := errors.Join(connErr, chErr, qErr)

if err != nil {
return nil, fmt.Errorf("failed to create RabbitMQ instance: %s\n", err)
}

return &RabbitMQ{
Channel: ch,
Queue:   q,
}, nil
}
Create a method for RabbitMQ instance to publish a message to the queue. This method requires context object, queue name and the message content.
func (rq *RabbitMQ) PublishWithCtx(ctx context.Context, queueName string, body []byte) error {
return rq.Channel.PublishWithContext(ctx,
"",        // exchange
queueName, // routing key
false,     // mandatory
false,     // immediate
amqp.Publishing{
ContentType: "application/json",
Body:        body,
})
}
Create a method for RabbitMQ instance to consume the messages from the queue. This method requires queue name.
func (rq *RabbitMQ) Consume(queueName string) (<-chan amqp091.Delivery, error) {
return rq.Channel.Consume(
queueName, // queue
"",        // consumer
true,      // auto-ack
false,     // exclusive
false,     // no-local
false,     // no-wait
nil,       // args
)
}
Create Ads Service
Create a new directory called ads. After that, initialize a go module for this package.
go mod init ads-service
Install the required packages.
go get github.com/google/uuid
go get github.com/labstack/echo/v5
go get github.com/labstack/echo/v5/middleware
go get github.com/rabbitmq/amqp091-go
Create a new file called main.go to store the main logic inside this service.
Import the required packages.
package main

import (
"common/models"
"common/rabbitmq"
"context"
"encoding/json"
"fmt"
"log"
"net/http"
"time"

"github.com/google/uuid"
"github.com/labstack/echo/v5"
"github.com/labstack/echo/v5/middleware"
)

var RMQ *rabbitmq.RabbitMQ
Inside the main function, initialize the Echo application and RabbitMQ instance.
func main() {
var err error

e := echo.New()
e.Use(middleware.RequestLogger())

RMQ, err = rabbitmq.InitRabbitMQ()

if err != nil {
log.Fatalf("failed to init RabbitMQ: %s\n", err)
}

// create controller here

// start the server
if err := e.Start(":1323"); err != nil {
e.Logger.Error("failed to start server", "error", err)
}
}
After the Echo and RabbitMQ instance are initialized, Create a controller for creating the advertisement data.
func main() {
// other codes...
e.POST("/ads/create", func(c *echo.Context) error {
req := new(models.AdRequest)

// bind request body
if err := c.Bind(req); err != nil {
return c.JSON(http.StatusBadRequest, models.Response[any]{
Success: false,
Message: "request invalid",
})
}

// create advertisement record
record := models.Ad{
ID:       uuid.NewString(),
Title:    req.Title,
Content:  req.Content,
Category: req.Category,
}

// send record to the message queue
if err := sendToQueue(record); err != nil {
return c.JSON(http.StatusInternalServerError, models.Response[any]{
Success: false,
Message: err.Error(),
})
}

// return created advertisement record
return c.JSON(http.StatusCreated, models.Response[models.Ad]{
Success: true,
Message: "ad created",
Data:    record,
})
})
}
Notice that in the create advertisement controller, the sendToQueue is called for sending the advertisement record to the message queue.
Create a function to store the advertisement record to the message queue called sendToQueue. Create this function outside the main function.
func sendToQueue(data models.Ad) error {
// create context object
ctx, cancel := context.WithTimeout(context.Background(), 5*time.Second)
defer cancel()

// parse advertisement data
body, err := json.Marshal(data)
if err != nil {
return fmt.Errorf("failed to parse data: %s\n", err)
}

// send advertisement data to the message queue
err = RMQ.PublishWithCtx(ctx, RMQ.Queue.Name, body)
if err != nil {
return fmt.Errorf("failed to publish message: %s\n", err)
}

return nil
}
The sendToQueue function sends the advertisement record to the message queue by calling the PublishWithCtx method from the RabbitMQ instance.
Create a Dockerfile for running this service as a Docker container.
FROM golang:1.25 AS build-stage

WORKDIR /app

COPY . .

WORKDIR /app/ads

RUN go mod download
RUN CGO_ENABLED=0 GOOS=linux go build -o /adsapp

FROM gcr.io/distroless/base-debian11 AS build-release-stage

WORKDIR /

COPY --from=build-stage /adsapp /adsapp

EXPOSE 1323

USER nonroot:nonroot

ENTRYPOINT [ "./adsapp" ]
Create API Gateway Service
Create a new directory called gateway. After that, initialize a go module for this package.
go mod init gateway-service
Install the required packages.
go get github.com/labstack/echo/v5
go get github.com/labstack/echo/v5/middleware
Create a main function inside the main.go file. Then, import the required packages.
package main

import (
"bytes"
"common/models"
"common/utils"
"encoding/json"
"fmt"
"net/http"
"time"

"github.com/labstack/echo/v5"
"github.com/labstack/echo/v5/middleware"
)
Inside the main function, initialize the Echo application and start the server as well.
func main() {
e := echo.New()
e.Use(middleware.RequestLogger())

e.POST("/api/ads", createAd)

if err := e.Start(":8080"); err != nil {
e.Logger.Error("failed to start server", "error", err)
}
}
Create a controller called createAd to create a new advertisement record. This controller sends HTTP request to the advertisement service to create a new advertisement record.
Before sending the HTTP request, parse the request body and initialize the HTTP client.
func createAd(c *echo.Context) error {
adReq := new(models.AdRequest)

if err := c.Bind(adReq); err != nil {
return c.JSON(http.StatusBadRequest, models.Response[any]{
Success: false,
Message: "request invalid",
})
}

// create HTTP client with 10-second request timeout
client := &http.Client{
Timeout: 10 * time.Second,
}

// parse request body as a JSON
body, err := json.Marshal(adReq)
if err != nil {
return c.JSON(http.StatusBadRequest, models.Response[any]{
Success: false,
Message: "request invalid",
})
}

adsServiceUrl := utils.GetConfig(utils.ADS_SERVICE_BASE_URL)
adsEndpoint := fmt.Sprintf("%s/ads/create", adsServiceUrl)

// create HTTP POST request to the advertisement service
request, err := http.NewRequest(http.MethodPost, adsEndpoint, bytes.NewBuffer(body))

if err != nil {
return c.JSON(http.StatusInternalServerError, models.Response[any]{
Success: false,
Message: "failed to create a request",
})
}

request.Header.Set("Content-Type", "application/json")
}
After the request body is parsed and HTTP client is initialized, send the HTTP request and store the response body in a JSON format.
func createAd(c *echo.Context) error {
// other codes...
// send HTTP request
response, err := client.Do(request)
if err != nil || response.StatusCode != http.StatusCreated {
return c.JSON(http.StatusInternalServerError, models.Response[any]{
Success: false,
Message: "failed to create ad",
})
}

// close the response body after parse process is completed
defer response.Body.Close()

// variable to store the response body
var data models.Response[models.Ad]

// parse response body and store in the "data" variable
err = json.NewDecoder(response.Body).Decode(&data)
if err != nil {
return c.JSON(http.StatusInternalServerError, models.Response[any]{
Success: false,
Message: "failed to parse ad data",
})
}

return c.JSON(http.StatusCreated, data)
}
Create a Dockerfile for running this service as a Docker container.
FROM golang:1.25 AS build-stage

WORKDIR /app

COPY . .

WORKDIR /app/gateway

RUN go mod download
RUN CGO_ENABLED=0 GOOS=linux go build -o /gatewayapp

FROM gcr.io/distroless/base-debian11 AS build-release-stage

WORKDIR /

COPY --from=build-stage /gatewayapp /gatewayapp

EXPOSE 1323

USER nonroot:nonroot

ENTRYPOINT [ "./gatewayapp" ]
Create Notification Service
Create a new directory called notification. After that, initialize a go module for this package.
go mod init notification-service
Install the required package.
go get github.com/rabbitmq/amqp091-go
Create a main function inside the main.go file. Then, import the required packages.
package main

import (
"common/models"
"common/rabbitmq"
"encoding/json"
"fmt"
"log"
"strings"
)

var RMQ *rabbitmq.RabbitMQ
In the main function, initialize the RabbitMQ instance and consume the incoming messages from the queue.
The incoming messages are retrieved from the message queue via delivery channel. Consume the messages inside the goroutine.
func main() {
var err error

// initialize RabbitMQ instance
RMQ, err = rabbitmq.InitRabbitMQ()

if err != nil {
log.Fatalf("failed to init RabbitMQ: %s\n", err)
}

// consume messages
msgs, err := RMQ.Consume(RMQ.Queue.Name)

if err != nil {
log.Fatalf("failed to consume queue: %s\n", err)
}

var forever chan struct{}

// parse the messages
go func() {
for d := range msgs {
parseMessage(d.Body)
}
}()

log.Println("[*] Waiting for messages. To exit press CTRL+C")
<-forever
}
The parseMessage function parses the incoming messages from the queue. This is the complete implementation of the function.
func parseMessage(body []byte) {
var record models.Ad

if err := json.Unmarshal(body, &record); err != nil {
log.Fatalf("failed to parse message: %s\n", err)
}

fmt.Println("send notification...")
fmt.Println(strings.Repeat("=", 5))
fmt.Println("title: ", record.Title)
fmt.Println("content: ", record.Content)
fmt.Println("category: ", record.Category)
fmt.Println(strings.Repeat("=", 5))
fmt.Println("notification sent")
}
Create a Dockerfile for running this service as a Docker container.
FROM golang:1.25 AS build-stage

WORKDIR /app

COPY . .

WORKDIR /app/notification

RUN go mod download
RUN CGO_ENABLED=0 GOOS=linux go build -o /notifapp

FROM gcr.io/distroless/base-debian11 AS build-release-stage

WORKDIR /

COPY --from=build-stage /notifapp /notifapp

EXPOSE 1323

USER nonroot:nonroot

ENTRYPOINT [ "./notifapp" ]
The services can be run and managed easily using Docker compose. Check out the complete file here
Run the Project
The services can be run using this command. This command run all the specified services in the Docker compose file.
docker compose up -d
Try to send the HTTP request. This request is sent to the gateway service.
curl -X POST "http://localhost:8080/api/ads" \
  -H "Content-Type: application/json" \
  -d '{"title":"new ad","content":"ad content","category":"anything but new"}'
If successful, the notification service should be able to parse the message from the queue. Check it using docker logs notification-service
send notification...
=====
title:  new ad
content:  ad content
category:  anything but new
=====
notification sent
Sources
⭐️ If you found this post is helpful, don't forget to like and save it. If you have any feedbacks, please let me know in the comment section down below.
Thank you