Building CI/CD Pipelines (Without Losing Your Mind)
Beginner Level
Hey everyone! As members of the open-source community, we're all passionate about building awesome things – from libraries that power the internet to tools that make developers’ lives easier. But sometimes, getting those amazing contributions into production can feel… well, a bit like herding cats. That's where CI/CD pipelines come in!
What is a CI/CD Pipeline, Anyway? (Don't worry, it's not as scary as it sounds)
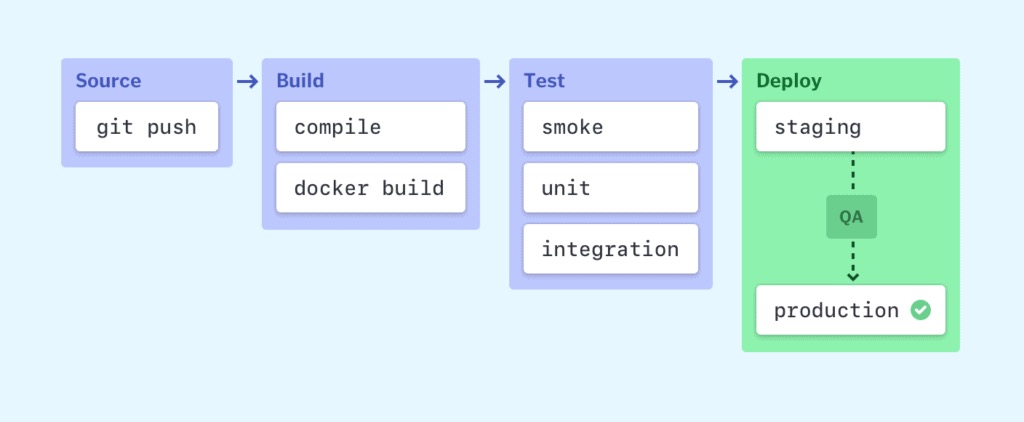
CI/CD stands for Continuous Integration and Continuous Delivery/Deployment. Think of it as an automated assembly line for your code.
- Continuous Integration (CI): Whenever someone commits code to your repository, the CI system automatically pulls that code, builds it, runs tests, and checks for integration issues. It's like constantly merging small updates instead of waiting for a massive, potentially disastrous, merge at the end. This helps catch bugs early and keeps your codebase healthy.
- Continuous Delivery (CD): Takes the CI step a little further by automating the process of releasing your code to a staging or testing environment. It ensures that your software is always in a deployable state.
- Continuous Deployment (also CD): The ultimate goal! Automates the entire release process, including deploying code directly to production after passing all tests. This allows for faster feedback loops and quicker delivery of value to users.
Why Should We Care? (Besides Saving Our Sanity)
For open-source projects, a solid CI/CD pipeline offers huge benefits:
- Faster Feedback: Developers get instant notifications when their code breaks something.
- Reduced Risk: Automated tests catch bugs before they reach users. (Nobody likes a surprise bug!)
- Increased Confidence: Knowing your code is consistently tested and deployed gives you peace of mind.
- Easier Collaboration: Everyone benefits from clear, automated workflows.
- More Time for Innovation: Less time spent on manual deployment means more time coding!
Building Your Own Pipeline
Okay, enough theory. Let's dive into how to build a CI/CD pipeline. There are tons of tools out there – Jenkins, GitLab CI, GitHub Actions, CircleCI, Azure DevOps… the list goes on! Don’t feel overwhelmed; you don't need to master everything at once.
I'll focus on GitHub Actions here, as it's widely used and integrates seamlessly with GitHub repositories (which is probably where your awesome open-source projects live). It also has a generous free tier – perfect for getting started!
Here’s a basic workflow example:
- Create a
.github/workflows directory in your repository. This is where you'll store your workflow files.
- Create a YAML file (e.g.,
main.yml) inside the directory. This file defines the steps of your pipeline. Here’s an example:
name: CI/CD Pipeline

on:
  push:
    branches:
      - main  # Trigger the workflow on pushes to the 'main' branch

jobs:
  build:
    runs-on: ubuntu-latest  # Use a Linux runner

    steps:
      - uses: actions/checkout@v3 # Checkout the code from the repository

      - name: Set up Node.js 16
        uses: actions/setup-node@v3
        with:
          node-version: 16

      - name: Install dependencies
        run: npm install

      - name: Run tests
        run: npm test  # Replace with your testing command (e.g., pytest, rspec)

      - name: Build the project
        run: npm run build # Replace with your build command

      - name: Deploy to staging (optional)
        if: github.ref == 'refs/heads/main'
        run: |
          # Add your deployment commands here - e.g., using SSH, cloud provider CLI tools etc.
          echo "Deploying to staging..."
Let’s break down that YAML:
name: A descriptive name for your workflow.on: Specifies when the workflow should run (in this case, on pushes to the main branch).jobs: Defines a set of tasks to be executed in parallel or sequentially. Here we have one job called build.runs-on: Specifies the virtual environment where your job will run. ubuntu-latest is a common choice.steps: A list of individual tasks to perform within the job. Each step uses pre-built actions from the GitHub Actions marketplace (like actions/checkout@v3).
Important Notes and Tips:
- Actions Marketplace: The GitHub Actions marketplace has tons of community-created actions for everything from linting your code to sending Slack notifications on build failures. Explore it!
- Secrets Management: Don't hardcode API keys or passwords in your workflow files! Use GitHub Secrets (Settings -> Secrets -> Actions) instead. It's much safer.
- Testing is Key: Write good tests! They are the foundation of a robust CI/CD pipeline. Aim for high test coverage.
- Branching Strategy: Consider adopting a branching strategy like Gitflow to streamline your development process.
- Notifications: Configure notifications (e.g., Slack, email) to be alerted about build failures and deployments.
Troubleshooting: Because Things Always Go Wrong
Expect things to break! Your first pipeline won’t be perfect. Here are a few common troubleshooting tips:
- Check the logs: The GitHub Actions UI provides detailed logs for each step of your workflow. Read them carefully!
- Permissions: Make sure your workflow has the necessary permissions to access your repository and deploy to your target environment.
- Dependencies: Double-check that all dependencies are installed correctly.
- Don't Panic: Seriously, it happens to everyone. Debugging is part of the process!
Resources to Explore
The Takeaway
Building a CI/CD pipeline is an investment in the future of your open-source project. It might seem daunting at first, but it’s worth the effort. By automating your build, test, and deployment processes, you can free up time to focus on what truly matters – writing awesome code!
Now go forth and automate! And if you have any questions or tips of your own, share them in the comments below!
(P.S. If you accidentally deploy a broken version of your project to production, just blame the bot. It's always a good strategy.)